Embed Studio
Embed Prisma Studio in your own application
Section titled “Embed Prisma Studio in your own application”Prisma Studio can be embedded in your own application via the @prisma/studio-core package.
It provides Studio, a React component which renders Prisma Studio for your database. The Studio component accepts an executor that calls a /studio endpoint in your backend. The backend uses your DATABASE_URL (connection string) to connect to the correct database instance (PostgreSQL, SQLite, or MySQL) and execute the SQL query.
You can embed Prisma Studio in your own app in various scenarios:
- Create an admin dashboard for editing data
- Multi-tenant application where every user has their own DB
- Let your users view and edit their own data
-
Frontend: A React application
-
Backend:
- A server-side application to expose the
/studioendpoint (e.g. with Express or Hono) - A database instance (PostgreSQL, SQLite, or MySQL)
- A server-side application to expose the
Embedded Prisma Studio supports the following databases:
- PostgreSQL
- SQLite
- MySQL
Install the npm package:
bun add @prisma/studio-corepnpm add @prisma/studio-coreyarn add @prisma/studio-corenpm install @prisma/studio-coreDepending on your database type, you may need additional packages:
# For SQLite support

bun add better-sqlite3

# For MySQL support

bun add mysql2# For SQLite support
pnpm add better-sqlite3
# For MySQL support
pnpm add mysql2# For SQLite support
yarn add better-sqlite3
# For MySQL support
yarn add mysql2# For SQLite support
npm install better-sqlite3
# For MySQL support
npm install mysql2PostgreSQL support is included with @prisma/studio-core and requires no additional dependencies.
In your React app, you can use the Studio component to render the tables in your database via Prisma Studio. It receives an executor which is responsible for packaging the current SQL query in an HTTP request (also allowing for custom headers/payloads) and sending it to the /studio endpoint in your backend.
The implementation varies slightly depending on your database type. Choose the appropriate section below:
Check out the demo on GitHub for a full reference implementation.
Here's what a minimal implementation looks like for PostgreSQL:
import { Studio } from "@prisma/studio-core/ui";

import { createPostgresAdapter } from "@prisma/studio-core/data/postgres-core";

import { createStudioBFFClient } from "@prisma/studio-core/data/bff";

import "@prisma/studio-core/ui/index.css";

function App() {

  const adapter = useMemo(() => {

    // 1. Create a client that points to your backend endpoint

    const executor = createStudioBFFClient({

      url: "http://localhost:4242/studio",

    });

    // 2. Create a Postgres adapter with the executor

    const adapter = createPostgresAdapter({ executor });

    return adapter;

  }, []);

  return (

    <Layout>

      <Studio adapter={adapter} />

    </Layout>

  );

}Here's what a minimal implementation looks like for SQLite:
import { Studio } from "@prisma/studio-core/ui";

import { createSQLiteAdapter } from "@prisma/studio-core/data/sqlite-core";

import { createStudioBFFClient } from "@prisma/studio-core/data/bff";

import "@prisma/studio-core/ui/index.css";

function App() {

  const adapter = useMemo(() => {

    // 1. Create a client that points to your backend endpoint

    const executor = createStudioBFFClient({

      url: "http://localhost:4242/studio",

    });

    // 2. Create a SQLite adapter with the executor

    const adapter = createSQLiteAdapter({ executor });

    return adapter;

  }, []);

  return (

    <Layout>

      <Studio adapter={adapter} />

    </Layout>

  );

}Here's what a minimal implementation looks like for MySQL:
import { Studio } from "@prisma/studio-core/ui";

import { createMySQLAdapter } from "@prisma/studio-core/data/mysql-core";

import { createStudioBFFClient } from "@prisma/studio-core/data/bff";

import "@prisma/studio-core/ui/index.css";

function App() {

  const adapter = useMemo(() => {

    // 1. Create a client that points to your backend endpoint

    const executor = createStudioBFFClient({

      url: "http://localhost:4242/studio",

    });

    // 2. Create a MySQL adapter with the executor

    const adapter = createMySQLAdapter({ executor });

    return adapter;

  }, []);

  return (

    <Layout>

      <Studio adapter={adapter} />

    </Layout>

  );

}Here's what an implementation with custom headers/payload looks like (works for all database types):
import { Studio } from "@prisma/studio-core/ui";

import { createPostgresAdapter } from "@prisma/studio-core/data/postgres-core";

import { createStudioBFFClient } from "@prisma/studio-core/data/bff";

import "@prisma/studio-core/ui/index.css";

function App() {

  const adapter = useMemo(() => {

    // 1. Create a client that points to your backend endpoint

    const executor = createStudioBFFClient({

      url: "http://localhost:4242/studio",

      customHeaders: {

        "X-Custom-Header": "example-value", // Pass any custom headers

      },

      customPayload: {

        customValue: "example-value", // Pass any custom data

      },

    });

    // 2. Create a database adapter with the executor

    const adapter = createPostgresAdapter({ executor }); // PostgreSQL

    // const adapter = createSQLiteAdapter({ executor }); // SQLite

    // const adapter = createMySQLAdapter({ executor }); // MySQL

    return adapter;

  }, []);

  return (

    <Layout>

      <Studio adapter={adapter} />

    </Layout>

  );

}You can customize the look and feel of Prisma Studio so that it matches your application's design. This is done by passing a custom theme to the Studio component. A theme is a set of CSS variables that define colors, spacing, and other style properties for both light and dark modes.
Here's an example of applying a custom theme:
import { Studio } from "@prisma/studio-core/ui";

import { createPostgresAdapter } from "@prisma/studio-core/data/postgres-core";

import { createStudioBFFClient } from "@prisma/studio-core/data/bff";

import "@prisma/studio-core/ui/index.css";

const customTheme = `

@layer base {

  :root {

    --background: 0 0% 100%;

    --foreground: 20 14.3% 4.1%;

    --primary: 47.9 95.8% 53.1%;

    --primary-foreground: 26 83.3% 14.1%;

    --border: 20 5.9% 90%;

    --input: 20 5.9% 90%;

    --ring: 20 14.3% 4.1%;

    --radius: 0rem;

  }

  .dark {

    --background: 20 14.3% 4.1%;

    --foreground: 60 9.1% 97.8%;

    --primary: 47.9 95.8% 53.1%;

    --primary-foreground: 26 83.3% 14.1%;

    --border: 12 6.5% 15.1%;

    --input: 12 6.5% 15.1%;

    --ring: 35.5 91.7% 32.9%;

  }

}

`;

function App() {

  const adapter = useMemo(() => {

    const executor = createStudioBFFClient({

      url: "http://localhost:4242/studio",

    });

    return createPostgresAdapter({ executor });

  }, []);

  return (

    <Layout>

      <Studio theme={customTheme} adapter={adapter} />

    </Layout>

  );

}
With this setup, Studio inherits your custom colors, borders, and typography rules. You can define as many or as few variables as you need.
The key concepts in your frontend:
- Executor: The bridge between Studio and your backend, it's created using the
createStudioBFFClientfunction - Adapter: Handles database-specific query formatting (PostgreSQL, SQLite, or MySQL)
- Custom headers: Pass authentication tokens, user info, etc.
- Custom payload: Send additional context/data with each request
Your backend needs to expose a /studio endpoint where the frontend sends its requests. The implementation varies depending on your database type. Choose the appropriate section below:
The PostgreSQL implementation uses createPrismaPostgresHttpClient from @prisma/studio-core. This works with Prisma Postgres or any PostgreSQL instance.
Check out the demo on GitHub for a full reference implementation.
Here's what a minimal implementation for the /studio endpoint looks like with Hono. This assumes that your connection URL is available via the DATABASE_URL env var:
import { Hono } from "hono";

import { createPrismaPostgresHttpClient } from "@prisma/studio-core/data/ppg";

import { serializeError } from "@prisma/studio-core/data/bff";

const app = new Hono().use("*", cors());

app.post("/studio", async (c) => {

  // 1. Extract the query and custom data from the request

  const { query } = await c.req.json();

  // 2. Read DB URL from env vars

  const url = process.env.DATABASE_URL;

  // 3. Execute the query against Prisma Postgres

  const [error, results] = await createPrismaPostgresHttpClient({ url }).execute(query);

  // 6. Return results or errors

  if (error) {

    return c.json([serializeError(error)]);

  }

  return c.json([null, results]);

});The SQLite implementation uses createNodeSQLiteExecutor from @prisma/studio-core and requires the better-sqlite3 package. This works with local SQLite database files.
import { Hono } from "hono";

import { createNodeSQLiteExecutor } from "@prisma/studio-core/data/node-sqlite";

import { serializeError } from "@prisma/studio-core/data/bff";

import DatabaseSync from "better-sqlite3";

const app = new Hono().use("*", cors());

app.post("/studio", async (c) => {

  try {

    // 1. Extract the query from the request

    const { query } = await c.req.json();

    // 2. Read DB URL from env vars (should be a file path)

    const url = process.env.DATABASE_URL;

    if (!url) {

      return c.json([serializeError(new Error("DATABASE_URL is missing"))], 500);

    }

    // 3. Extract file path from URL and create database connection

    const dbPath = url.replace("file:", "");

    const database = new DatabaseSync(dbPath);

    // 4. Execute the query against SQLite

    const [error, results] = await createNodeSQLiteExecutor(database).execute(query);

    // 5. Return results or errors

    if (error) {

      return c.json([serializeError(error)]);

    }

    return c.json([null, results]);

  } catch (err) {

    return c.json([serializeError(err)], 400);

  }

});The MySQL implementation uses createMySQL2Executor from @prisma/studio-core and requires the mysql2 package. This works with MySQL instances.
import { Hono } from "hono";

import { createMySQL2Executor } from "@prisma/studio-core/data/mysql2";

import { serializeError } from "@prisma/studio-core/data/bff";

import mysql from "mysql2/promise";

const app = new Hono().use("*", cors());

app.post("/studio", async (c) => {

  try {

    // 1. Extract the query from the request

    const { query } = await c.req.json();

    // 2. Read DB URL from env vars

    const url = process.env.DATABASE_URL;

    if (!url) {

      return c.json([serializeError(new Error("DATABASE_URL is missing"))], 500);

    }

    // 3. Create MySQL connection pool

    const pool = mysql.createPool(url);

    // 4. Execute the query against MySQL

    const [error, results] = await createMySQL2Executor(pool).execute(query);

    // 5. Return results or errors

    if (error) {

      return c.json([serializeError(error)]);

    }

    return c.json([null, results]);

  } catch (err) {

    return c.json([serializeError(err)], 400);

  }

});Here's what a slightly more advanced implementation for the /studio endpoint looks like with Hono. In this case, a multi-tenant scenario is assumed where the frontend sends over a user ID and authentication token which is used on the backend to determine the database instance that belongs to that user via a hypothetical determineUrlFromContext function:
// server/index.ts

import { Hono } from "hono";

import { createPrismaPostgresHttpClient } from "@prisma/studio-core/data/ppg";

import { serializeError } from "@prisma/studio-core/data/bff";

const app = new Hono().use("*", cors());

app.post("/studio", async (c) => {

  // 1. Extract the query and custom data from the request

  const { query, customPayload } = await c.req.json();

  // 2. Access custom headers (great for auth!)

  const customHeader = c.req.header("X-Custom-Header");

  console.log("Received headers:", { customHeader });

  // 3. Use custom payload data

  console.log("Received value:", customPayload.customValue);

  // 4. Determine the URL (this is where you'd implement your auth logic)

  const url = determineUrlFromContext(customHeader, customPayload);

  // 5. Execute the query using the appropriate database client

  // PostgreSQL:

  const [error, results] = await createPrismaPostgresHttpClient({ url }).execute(query);

  // SQLite: (requires additional setup with better-sqlite3)

  // MySQL: (requires additional setup with mysql2)

  // 6. Return results or errors

  if (error) {

    return c.json([serializeError(error)]);

  }

  return c.json([null, results]);

});- Query object: Contains the SQL query and parameters from Studio
- Custom payload: Additional data sent with each request
- Database client: Executes queries against your database (PostgreSQL, SQLite, or MySQL)
- Error handling: Properly serialize errors for Studio to display
The execution flow in your embedded Prisma Studio version:
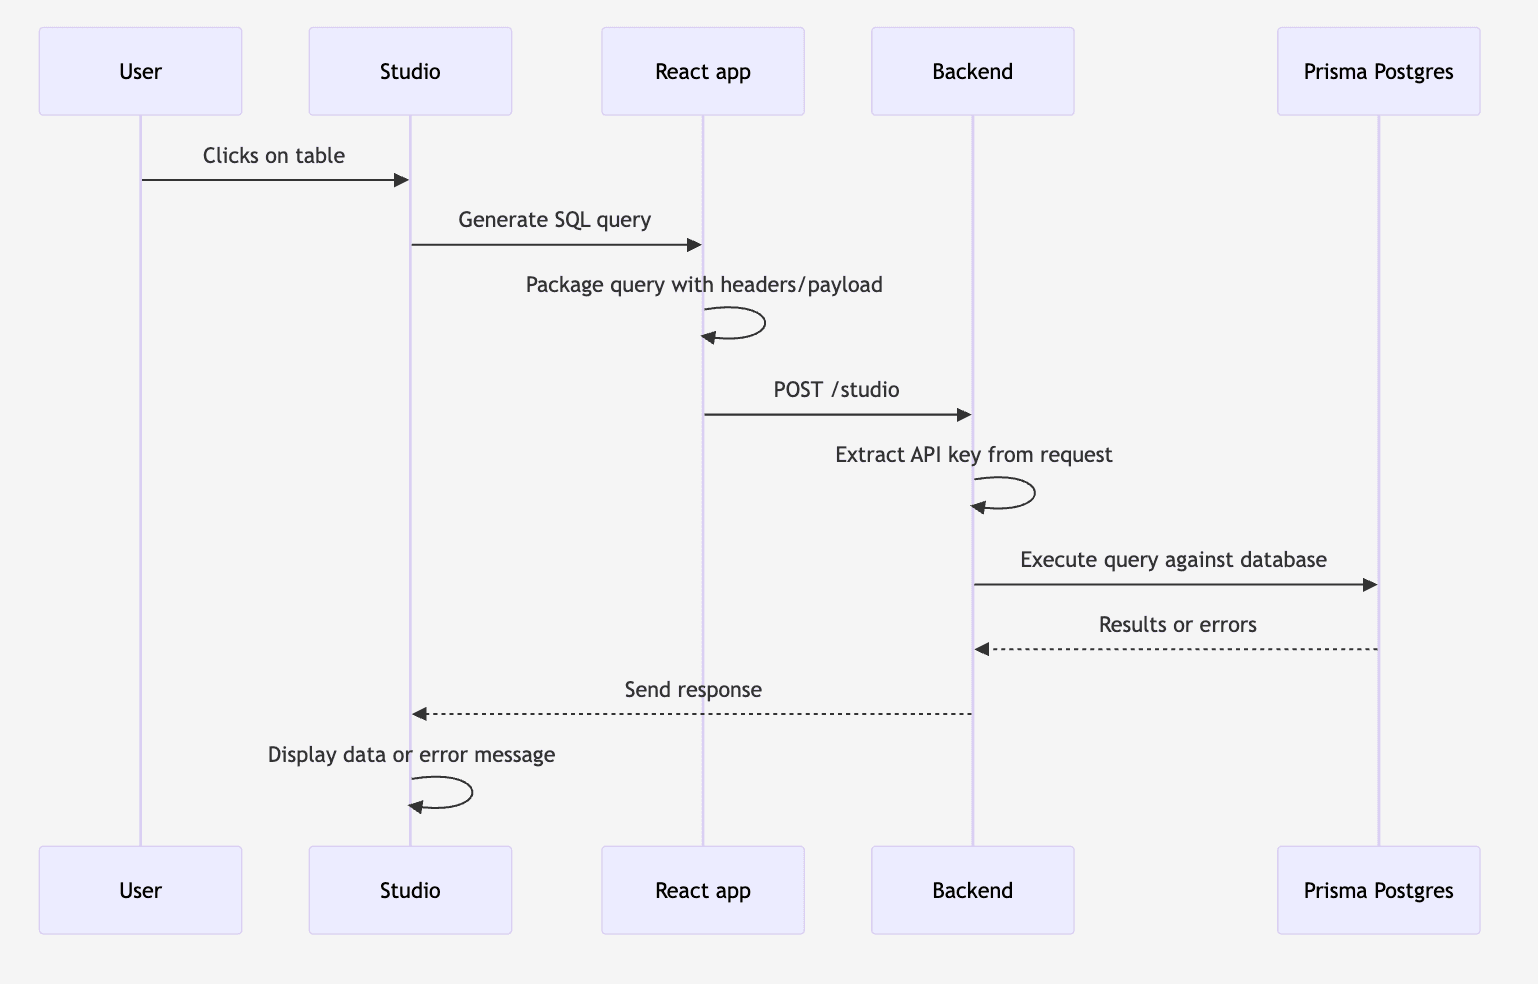
When you want to authenticate the users of your app against Prisma Studio, you can do that by adding custom logic around your embedded Prisma Studio version.
On the frontend, you can ensure to pass the Authorization header and other data (e.g. a user ID) when creating the executor:
const executor = createStudioBFFClient({

  url: "http://localhost:4242/studio",

  customHeaders: {

    "X-User-ID": currentUser.id,

    Authorization: `Bearer ${userToken}`,

  },

});
In your server-side implementation, you can then retrieve these values from the incoming request and extract the Prisma Postgres API key that's needed for this user's query:
const userId = c.req.header("X-User-ID");

const token = c.req.header("Authorization");

const userApiKey = await getUserApiKey(userId, token);Embeddable Prisma Studio (Free) is licensed under Apache 2.0.
✔️ Free for production use
⚠️ Prisma branding must remain visible and unaltered
🔐 To remove our branding or to inquire about upcoming partner-only features, ping us here: partnerships@prisma.io
This package includes anonymized telemetry to help us improve Prisma Studio.
Use implies consent. Learn more in our Privacy Policy.