Permit.io
Permit.io is an authorization-as-a-service platform that lets you implement fine-grained access control rules based on real-world relationships.
This guide explains how to connect Permit.io to a new Express + Prisma app, define a Relationship-Based Access Control (ReBAC) policy, and automatically filter Prisma queries so users only see the data they're allowed to access.
You'll build a small project-task API to demonstrate access inheritance in action - no manual WHERE clauses required.
You can find a complete example of this guide in Permit.io's ReBAC filtering walkthrough.
- Node.js v20+
- PostgreSQL (local or hosted)
- Prisma CLI (
npx prisma) - TypeScript
- Permit CLI (
npm install -g @permitio/cli)
First of all, you'll create a new Express + Prisma project from scratch using TypeScript. You'll also install the tools needed to support ReBAC filtering with Permit.io.
mkdir prisma-rebac-filtering

cd prisma-rebac-filtering

bun initmkdir prisma-rebac-filtering
cd prisma-rebac-filtering
pnpm initmkdir prisma-rebac-filtering
cd prisma-rebac-filtering
yarn initmkdir prisma-rebac-filtering
cd prisma-rebac-filtering
npm initInstall application and development dependencies:
bun add express cors dotenv @prisma/client@7 @prisma/adapter-pg pgpnpm add express cors dotenv @prisma/client@7 @prisma/adapter-pg pgyarn add express cors dotenv @prisma/client@7 @prisma/adapter-pg pgnpm install express cors dotenv @prisma/client@7 @prisma/adapter-pg pgbun add --dev prisma@prev typescript tsx @types/pgpnpm add -D prisma@prev typescript tsx @types/pgyarn add --dev prisma@prev typescript tsx @types/pgnpm install -D prisma@prev typescript tsx @types/pg[!NOTE] If you are using a different database provider (MySQL, SQL Server, SQLite), install the corresponding driver adapter package instead of
@prisma/adapter-pg. For more information, see Database drivers.
Then, initialize your Prisma setup:
Then, initialize your Prisma setup:
bunx --bun prisma initpnpm prisma inityarn prisma initnpx prisma initThis creates:
- A
prisma/directory with a defaultschema.prismafile - A
prisma.config.tsfile for configuring Prisma - A
.envfile at the root.
Create a tsconfig.json file:
{

  "compilerOptions": {

    "target": "ES2020",

    "module": "CommonJS",

    "moduleResolution": "bundler",

    "esModuleInterop": true,

    "forceConsistentCasingInFileNames": true,

    "strict": true,

    "skipLibCheck": true,

    "outDir": "dist"

  },

  "include": ["src", "scripts"]

}Set up your project folders:
mkdir -p src/controllers src/middleware src/config scriptsYou're now ready to define your Prisma data model.
Before continuing with the setup, define how access control will work in your application.
This guide uses Relationship-Based Access Control (ReBAC) to automatically restrict database queries based on a user's relationship to the data.
Here is what this looks like:
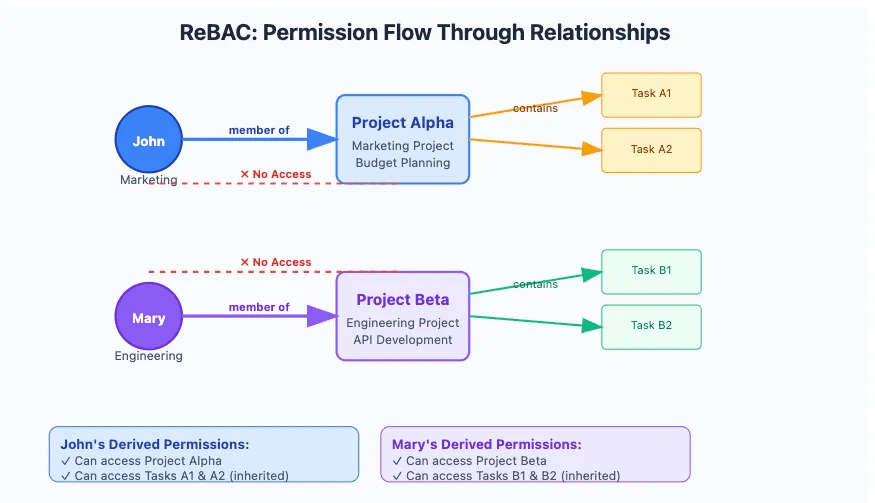
You're building a project management API that supports team-level access controls. Each project belongs to a team (like Marketing or Engineering), and users should only be able to access the projects, and their associated tasks, that they're assigned to.
ReBAC fits this case because:
- Access depends on relationships between users and data (e.g., team membership)
- You want task access to inherit from project access
- You want to avoid manually checking permissions in every controller
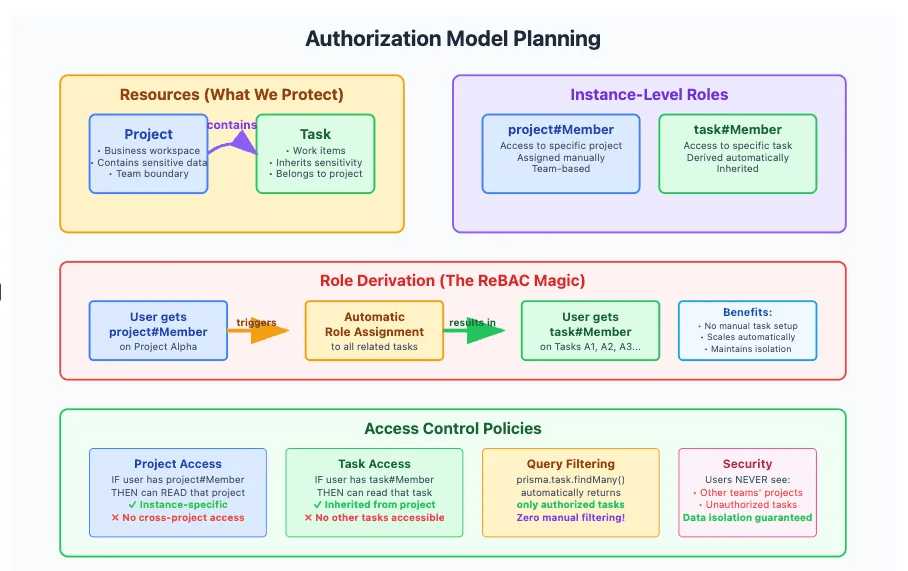
These are the main data entities you'll protect:
Project: Represents a team-specific workspace that may contain business-critical data (timelines, budgets, client deliverables).Task: Represents an item of work that belongs to a project
- Projects contain tasks (
Project → Task) - Users are members of projects (
User → Project)
Instance-level roles describe what users can do with specific resources:
| Role | Description |
|---|---|
project#Member |
User can access a specific project |
task#Member |
User can access tasks in that project |
ReBAC lets you automatically derive roles based on relationships. In this case:
- If a user is a
project#Member, they automatically become atask#Memberfor all tasks within that project. - New tasks inherit project access, so you do not need to update permissions manually.
Once relationships and roles are defined, access policies determine what users can do:
| Role | Action | Resource |
|---|---|---|
project#Member |
read |
Project |
task#Member |
read |
Task |
This model ensures that:
- Users can only access the projects and tasks they're assigned to
- No cross-team visibility
- Access automatically stays in sync with the business structure
To support permission-aware data filtering, you need to structure your database so that relationships are clearly defined. In this case, every Task belongs to a Project, and users gain access to tasks by being members of the parent project.
Open prisma/schema.prisma and replace the contents with the following:
generator client {

  provider = "prisma-client"

}

datasource db {

  provider = "postgresql"

}

model Project {

  id        String   @id @default(uuid())

  name      String

  tasks     Task[]   // One-to-many relationship for permission inheritance

  createdAt DateTime @default(now())

  updatedAt DateTime @updatedAt

}

model Task {

  id          String   @id @default(uuid())

  name        String

  description String?

  projectId   String

  project     Project  @relation(fields: [projectId], references: [id])

  createdAt   DateTime @default(now())

  updatedAt   DateTime @updatedAt

}To get access to the variables in the .env file, they can either be loaded by your runtime, or by using dotenv. Include an import for dotenv at the top of the prisma.config.ts
import "dotenv/config";

import { defineConfig, env } from "prisma/config";

export default defineConfig({

  schema: "prisma/schema.prisma",

  migrations: {

    path: "prisma/migrations",

  },

  datasource: {

    url: env("DATABASE_URL"),

  },

});To create the database schema:
bunx prisma migrate dev --name initpnpm prisma migrate dev --name inityarn prisma migrate dev --name initnpx prisma migrate dev --name initbunx prisma generatepnpm prisma generateyarn prisma generatenpx prisma generateThis will:
- Apply your schema to the connected PostgreSQL database
- Generate your Prisma Client
- Create tables for
ProjectandTaskwith a one-to-many relationship
You can open Prisma Studio to inspect your database:
bunx prisma studiopnpm prisma studioyarn prisma studionpx prisma studioThis structure allows the @permitio/permit-prisma extension to filter records by user relationships at query time. Next, you'll seed test data to simulate distinct team ownership over projects and tasks.
This structure allows the @permitio/permit-prisma extension to filter records by user relationships at query time. Next, you'll seed test data to simulate distinct team ownership over projects and tasks.
To test your data filtering logic, you'll create two projects, each with its own set of tasks. This separation simulates team ownership and will allow you to validate that users only see the data of their assigned project.
Create a new file at scripts/seed.ts and add the following:
import { PrismaClient } from "../src/generated/prisma/client";

import { PrismaPg } from "@prisma/adapter-pg";

const adapter = new PrismaPg({

  connectionString: process.env.DATABASE_URL!,

});

const prisma = new PrismaClient({

  adapter,

});

async function main() {

  console.log("🌱 Seeding test data...");

  // Clear existing records

  await prisma.task.deleteMany();

  await prisma.project.deleteMany();

  // Create Project Alpha for the Marketing team

  const projectAlpha = await prisma.project.create({

    data: {

      id: "project_alpha",

      name: "Marketing Campaign Q2",

    },

  });

  // Create Project Beta for the Engineering team

  const projectBeta = await prisma.project.create({

    data: {

      id: "project_beta",

      name: "API Development Sprint",

    },

  });

  // Add tasks to Project Alpha

  await prisma.task.createMany({

    data: [

      {

        id: "task-alpha-1",

        name: "Strategy Planning",

        description: "Define campaign goals and KPIs",

        projectId: projectAlpha.id,

      },

      {

        id: "task-alpha-2",

        name: "Budget Review",

        description: "Review marketing budget with finance",

        projectId: projectAlpha.id,

      },

    ],

  });

  // Add tasks to Project Beta

  await prisma.task.createMany({

    data: [

      {

        id: "task-beta-1",

        name: "Implement Auth API",

        description: "Create endpoints for user login/signup",

        projectId: projectBeta.id,

      },

      {

        id: "task-beta-2",

        name: "Schema Migration",

        description: "Update tables for new user roles",

        projectId: projectBeta.id,

      },

    ],

  });

  console.log("✅ Seeded 2 projects and 4 tasks with distinct ownership");

}

main()

  .catch((e) => {

    console.error("❌ Error seeding data:", e);

    process.exit(1);

  })

  .finally(async () => {

    await prisma.$disconnect();

});bunx tsx scripts/seed.tspnpm dlx tsx scripts/seed.tsyarn dlx tsx scripts/seed.tsnpx tsx scripts/seed.tsIf successful, you'll see:
✅ Seeded 2 projects and 4 tasks with distinct ownership
At this point, if you run a query like prisma.task.findMany(), it will return all tasks. In the next steps, you'll connect Permit.io to filter these results automatically based on the user's access rights.
In this section, you'll install the @permitio/permit-prisma extension and configure it to automatically filter Prisma queries based on your access control policies.
Install the permit-prisma package:
bun add @permitio/permit-prismapnpm add @permitio/permit-prismayarn add @permitio/permit-prismanpm install @permitio/permit-prismaCreate a new file at src/config/permit-config.ts:
import dotenv from "dotenv";

dotenv.config();

export const clientExtensionConfig = {

  permitConfig: {

    token: process.env.PERMIT_API_KEY!, // Your Permit.io API key

    pdp: process.env.PERMIT_PDP_URL || "http://localhost:7766", // Local or cloud PDP

    debug: true,

  },

  enableAutomaticChecks: true,

  enableDataFiltering: true, // Enables automatic query filtering

  enableResourceSync: true, // (Optional) Keeps Permit in sync with resource changes

};When you later extend the Prisma Client with this config:
- All Prisma queries will automatically check access rules
findMany()and similar methods will only return data the user is allowed to access- You no longer need to manually add
WHEREclauses to enforce permissions
You're now ready to define your ReBAC policy using the Permit CLI.
6. Define your access control policy in Permit.io
Section titled “6. Define your access control policy in Permit.io”Next, you'll use the Permit CLI to apply a ready-made ReBAC template that matches your project-task structure.
bun add --global @permitio/clipnpm add -g @permitio/cliyarn global add @permitio/clinpm install -g @permitio/cliUse the CLI to authenticate:
permit loginThis opens a browser window where you can log in to your Permit.io account and link your CLI session to an environment.
Permit provides a prebuilt policy structure for hierarchical data filtering.
Apply it using:
permit env template apply --template orm-data-filteringThis will create:
-
Resources:
project,task -
Relationships:
projectis the parent oftask -
Roles:
project#Member: User can access a specific projecttask#Member: Derived from project membership
-
Access policies: Users with the appropriate roles can
readeach resource
Go to the Permit.io dashboard and navigate to your environment to explore:
- Your resource graph
- Role derivations
- Relationship mappings
- Policy rules for
readaccess
With your policy in place, you're now ready to wire up user context and filtering logic in your Express middleware.
To filter Prisma queries per user, you need to:
- Identify the current user (simulated via an email header)
- Attach the filtered Prisma Client instance to the request
- Set the user in the Permit context (
prisma.$permit.setUser())
Create a new file: src/middleware/auth.middleware.ts
import { Request, Response, NextFunction } from "express";

import { PrismaClient } from "../generated/prisma/client.js";

import { PrismaPg } from "@prisma/adapter-pg";

import createPermitClientExtension from "@permitio/permit-prisma";

import { clientExtensionConfig } from "../config/permit-config";

const adapter = new PrismaPg({

  connectionString: process.env.DATABASE_URL!,

});

// Extend PrismaClient with Permit

const prisma = new PrismaClient({

  adapter,

}).$extends(createPermitClientExtension(clientExtensionConfig));

// Extend Request type with Prisma and user context

export interface AuthRequest extends Request {

  user?: { email: string };

  prisma?: typeof prisma;

}

export const authenticate = (req: AuthRequest, res: Response, next: NextFunction): void => {

  const userEmail = req.headers["x-user-email"] as string;

  if (!userEmail) {

    res.status(401).json({ error: "Missing user email" });

    return;

  }

  // Register the user in Permit context

  prisma.$permit.setUser(userEmail);

  // Add user + Prisma client to request

  req.user = { email: userEmail };

  req.prisma = prisma;

  next();

};- Reads the user's email from the request header
- Sets the user identity in the Permit context (used for query filtering)
- Adds the filtered Prisma client to the request object (
req.prisma) - Makes the user and database client available to all downstream route handlers
You're now ready to build your API endpoints without writing a single line of access control logic.
You'll now create two endpoints:
GET /api/projects: returns all projects the user has access toGET /api/tasks: returns all tasks the user has access to (inherited from project membership)
Thanks to the Permit-Prisma integration, you won't need to add any manual filtering logic; the extension handles it.
Create a controller file: src/controllers/project.controller.ts
import { Response } from "express";

import { AuthRequest } from "../middleware/auth.middleware";

export const getProjects = async (req: AuthRequest, res: Response) => {

  try {

    const prisma = req.prisma!;

    const projects = await prisma.project.findMany(); // Auto-filtered

    res.json({

      user: req.user?.email,

      count: projects.length,

      projects,

    });

  } catch (error: any) {

    console.error("Error fetching projects:", error);

    res.status(500).json({ error: error.message });

  }

};
Even though this is a raw findMany() query, only authorized records will be returned for the current user.
Create another controller: src/controllers/task.controller.ts
import { Response } from "express";

import { AuthRequest } from "../middleware/auth.middleware";

export const getTasks = async (req: AuthRequest, res: Response) => {

  try {

    const prisma = req.prisma!;

    const projectId = req.query.projectId as string;

    const where = projectId ? { projectId } : undefined;

    const tasks = await prisma.task.findMany({ where }); // Still filtered

    res.json({

      user: req.user?.email,

      count: tasks.length,

      tasks,

    });

  } catch (error: any) {

    console.error("Error fetching tasks:", error);

    res.status(500).json({ error: error.message });

  }

};- You can write normal Prisma queries
- Users will only get records they're allowed to see
- You don't need custom role-checking logic in every handler
- Task access is automatically derived from project membership
You're now ready to wire it all together and launch the app.
Create src/app.ts:
import express from "express";

import cors from "cors";

import { authenticate } from "./middleware/auth.middleware";

import { getProjects } from "./controllers/project.controller";

import { getTasks } from "./controllers/task.controller";

const app = express();

const PORT = process.env.PORT || 3000;

app.use(cors());

app.use(express.json());

// Auth middleware applies ReBAC filtering per request

app.get("/api/projects", authenticate, getProjects);

app.get("/api/tasks", authenticate, getTasks);

app.listen(PORT, () => {

  console.log(`🚀 Server running at http://localhost:${PORT}`);

  console.log(`🔐 ReBAC filtering is now active`);

});Start the development server with:
bunx tsx src/app.tspnpm dlx tsx src/app.tsyarn dlx tsx src/app.tsnpx tsx src/app.tsIf everything is set up correctly, the console will display:
🚀 Server running at http://localhost:3000

🔐 ReBAC filtering is now activeYou can simulate requests as different users by setting the x-user-email header. This mimics logged-in users with access to specific projects.
curl -H "x-user-email: john@company.com" http://localhost:3000/api/projectsThis should only return Project Alpha (and its tasks).
curl -H "x-user-email: mary@company.com" http://localhost:3000/api/tasksThis should only return tasks from Project Beta.
Once you've confirmed these results, your Prisma API is now enforcing secure, relationship-based access control, all without adding manual filtering logic anywhere in your code.
You've now built a secure API that:
- Filters query results based on user relationships
- Uses ReBAC to avoid role explosion and brittle permission logic
- Keeps permission checks out of your Prisma queries
Now that you've successfully implemented data filtering with Prisma and ReBAC, you can extend this foundation to support more complex authorization use cases and developer tooling.
- Add a
Usermodel and create a many-to-manyMembershiprelationship between users and projects. - Introduce instance-level roles like
EditororOwnerwith different permissions. - Support additional actions like
create,update, anddelete, using Permit.io's role policies.
Integrate your API with an auth provider (e.g., Clerk, Auth0) and replace the x-user-email header with a secure identity mechanism (like a JWT token).
Permit.io provides UI components for:
- Managing user access visually
- Reviewing access logs
- Approving access requests (MCP)
Explore Permit Elements to make access management easier for your end users or admins.