What is Prisma ORM?
Prisma ORM is an open-source next-generation ORM. It consists of the following parts:
-
Prisma Client: Auto-generated and type-safe query builder for Node.js & TypeScript
-
Prisma Migrate: Migration system
-
Prisma Studio: GUI to view and edit data in your database.
Prisma Client can be used in any Node.js (supported versions) or TypeScript backend application (including serverless applications and microservices). This can be a REST API, a GraphQL API, a gRPC API, or anything else that needs a database.
https://www.youtube.com/embed/EEDGwLB55bI
Every project that uses a tool from the Prisma ORM toolkit starts with a Prisma schema. The Prisma schema allows developers to define their application models in a declarative data modeling language. It also contains the connection to a database and defines a generator:
datasource db {

  provider = "postgresql"

}

generator client {

provider = "prisma-client"

output = "./generated"

}

model Post {

id Int @id @default(autoincrement())

title String

content String?

published Boolean @default(false)

author User? @relation(fields: [authorId], references: [id])

authorId Int?

}

model User {

id Int @id @default(autoincrement())

email String @unique

name String?

posts Post[]

}datasource db {
provider = "mongodb"
url = env("DATABASE_URL")
}
generator client {
provider = "prisma-client-js"
}
model Post {
id String @id @default(auto()) @map("_id") @db.ObjectId
title String
content String?
published Boolean @default(false)
author User? @relation(fields: [authorId], references: [id])
authorId String @db.ObjectId
}
model User {
id String @id @default(auto()) @map("_id") @db.ObjectId
email String @unique
name String?
posts Post[]
}Note: The Prisma schema lets you define "Prisma-level" relation fields which will make it easier to work with relations in the Prisma Client API. In the case above, the
postsfield onUseris defined only on "Prisma-level", meaning it does not manifest as a foreign key in the underlying database.
In this schema, you configure three things:
- Data source: Specifies your database connection. Database connection URLs are configured in
prisma.config.ts. - Generator: Indicates that you want to generate Prisma Client
- Data model: Defines your application models
Note: The Prisma schema lets you define "Prisma-level" relation fields which will make it easier to work with relations in the Prisma Client API. In the case above, the
postsfield onUseris defined only on "Prisma-level", meaning it does not manifest as a foreign key in the underlying database.
In this schema, you configure three things:
- Data source: Specifies your database connection. Database connection URLs are configured in
prisma.config.ts. - Generator: Indicates that you want to generate Prisma Client
- Data model: Defines your application models
Database connection URLs are configured in a prisma.config.ts file. Create a prisma.config.ts file in your project root:
import "dotenv/config";

import { defineConfig, env } from "prisma/config";

export default defineConfig({

  schema: "prisma/schema.prisma",

  migrations: {

    path: "prisma/migrations",

    seed: "tsx ./prisma/seed.ts",

  },

  datasource: {

    url: env("DATABASE_URL"),

  },

});On this page, the focus is on the data model. You can learn more about Data sources and Generators on the respective docs pages.
The data model is a collection of models. A model has two major functions:
- Represent a table in relational databases or a collection in MongoDB
- Provide the foundation for the queries in the Prisma Client API
There are two major workflows for "getting" a data model into your Prisma schema:
- Manually writing the data model and mapping it to the database with Prisma Migrate
- Generating the data model by introspecting a database
Once the data model is defined, you can generate Prisma Client which will expose CRUD and more queries for the defined models. If you're using TypeScript, you'll get full type-safety for all queries (even when only retrieving the subsets of a model's fields).
Accessing your database with Prisma Client
Section titled “Accessing your database with Prisma Client”The first step when using Prisma Client is installing the @prisma/client and prisma npm packages:
bun add prisma@6.19.3 --devpnpm add prisma@6.19.3 --save-devyarn add prisma@6.19.3 --devnpm install prisma@6.19.3 --save-devbun add @prisma/client@6.19.3pnpm add @prisma/client@6.19.3yarn add @prisma/client@6.19.3npm install @prisma/client@6.19.3Then, you can run prisma generate:
bunx prisma generatepnpm prisma generateyarn prisma generatenpx prisma generateThe prisma generate command reads your Prisma schema and generates Prisma Client code. The code is generated into the path specified in the output field of your generator block (e.g., ./generated as shown in the schema example above).
After you change your data model, you'll need to manually re-generate Prisma Client by running prisma generate to ensure the generated code gets updated.
The prisma generate command reads your Prisma schema and generates Prisma Client code. The code is generated into the path specified in the output field of your generator block (e.g., ./generated as shown in the schema example above).
After you change your data model, you'll need to manually re-generate Prisma Client by running prisma generate to ensure the generated code gets updated.
Using Prisma Client to send queries to your database
Section titled “Using Prisma Client to send queries to your database”Once Prisma Client has been generated, you can import it in your code and send queries to your database. This is what the setup code looks like.
import { PrismaClient } from "./generated/client";

const prisma = new PrismaClient();const { PrismaClient } = require("./generated/client");
const prisma = new PrismaClient();Now you can start sending queries via the generated Prisma Client API, here are a few sample queries. Note that all Prisma Client queries return plain old JavaScript objects.
Learn more about the available operations in the Prisma Client API reference.
Retrieve all User records from the database
// Run inside `async` function
const allUsers = await prisma.user.findMany();
Include the posts relation on each returned User object
// Run inside `async` function
const allUsers = await prisma.user.findMany({
  include: { posts: true },
});
Filter all Post records that contain "prisma"
// Run inside `async` function
const filteredPosts = await prisma.post.findMany({
  where: {
    OR: [{ title: { contains: "prisma" } }, { content: { contains: "prisma" } }],
  },
});
Create a new User and a new Post record in the same query
// Run inside `async` function
const user = await prisma.user.create({
  data: {
    name: "Alice",
    email: "alice@prisma.io",
    posts: {
      create: { title: "Join us for Prisma Day 2020" },
    },
  },
});
Update an existing Post record
// Run inside `async` function
const post = await prisma.post.update({
  where: { id: 42 },
  data: { published: true },
});
Now you can start sending queries via the generated Prisma Client API, here are a few sample queries. Note that all Prisma Client queries return plain old JavaScript objects.
Learn more about the available operations in the Prisma Client API reference.
Retrieve all User records from the database
Section titled “Retrieve all User records from the database”// Run inside `async` function
const allUsers = await prisma.user.findMany();Include the posts relation on each returned User object
Section titled “Include the posts relation on each returned User object”// Run inside `async` function
const allUsers = await prisma.user.findMany({
include: { posts: true },
});Filter all Post records that contain "prisma"
Section titled “Filter all Post records that contain "prisma"”// Run inside `async` function
const filteredPosts = await prisma.post.findMany({
where: {
OR: [{ title: { contains: "prisma" } }, { content: { contains: "prisma" } }],
},
});Create a new User and a new Post record in the same query
Section titled “Create a new User and a new Post record in the same query”// Run inside `async` function
const user = await prisma.user.create({
data: {
name: "Alice",
email: "alice@prisma.io",
posts: {
create: { title: "Join us for Prisma Day 2020" },
},
},
});// Run inside `async` function
const post = await prisma.post.update({
where: { id: 42 },
data: { published: true },
});Note that when using TypeScript, the result of this query will be statically typed so that you can't accidentally access a property that doesn't exist (and any typos are caught at compile-time). Learn more about using Prisma Client's generated types on the Advanced usage of generated types page in the docs.
There are two ways for "getting" your data model into the Prisma schema. Depending on which approach you choose, your main Prisma ORM workflow might look different.
With Prisma Migrate, Prisma ORM's integrated database migration tool, the workflow looks as follows:
- Manually adjust your Prisma schema data model
- Migrate your development database using the
prisma migrate devCLI command - Use Prisma Client in your application code to access your database
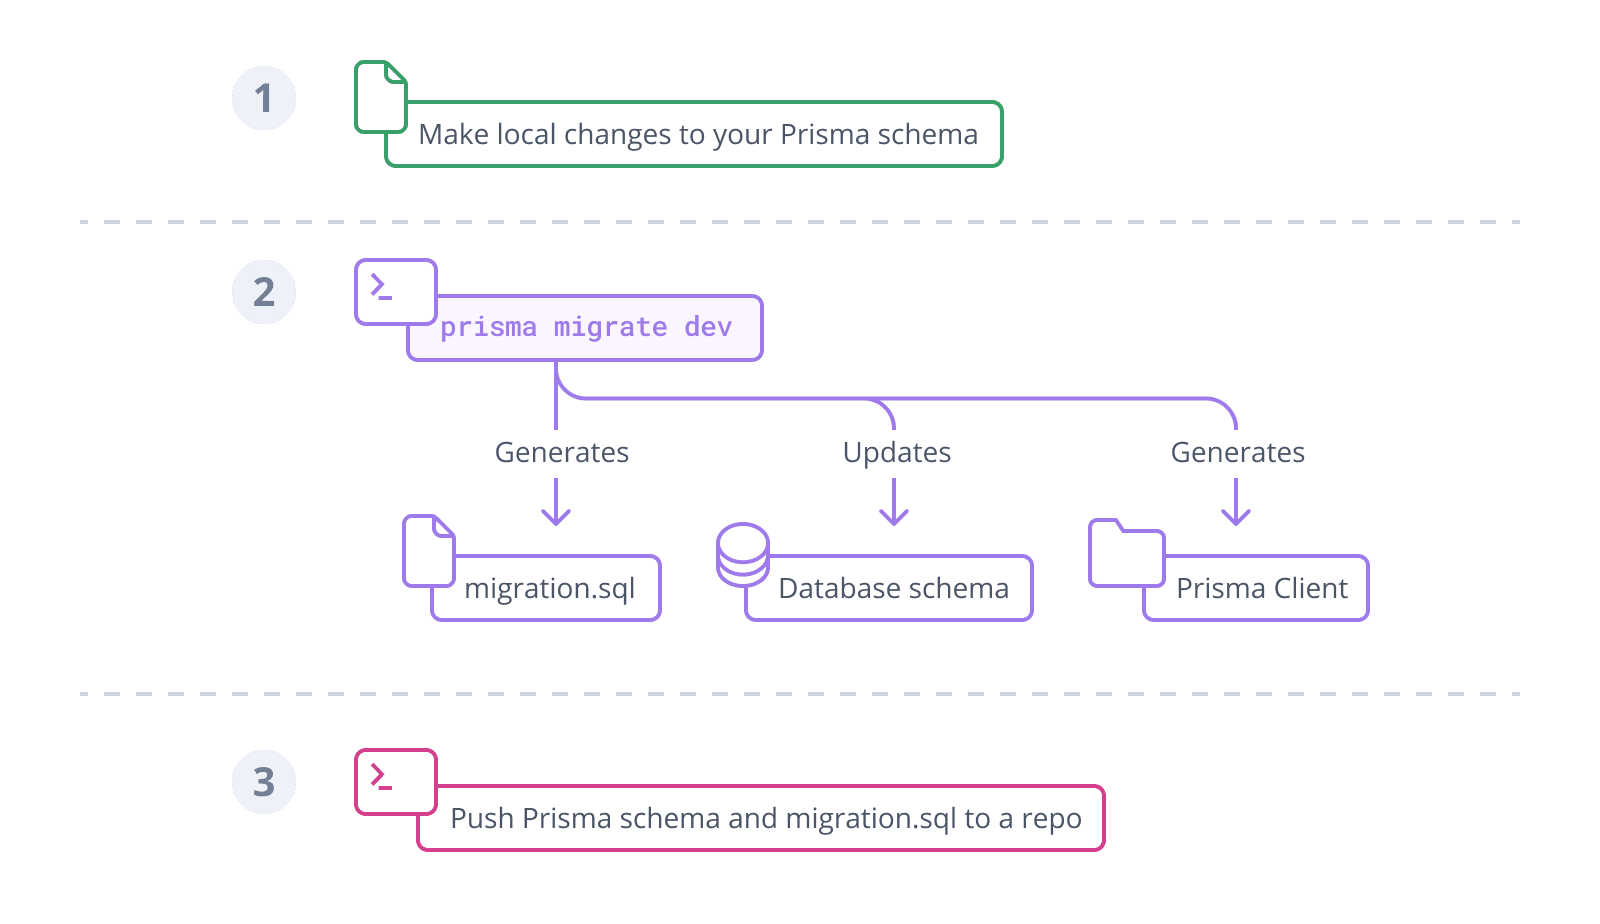
To learn more about the Prisma Migrate workflow, see:
If for some reason, you can not or do not want to use Prisma Migrate, you can still use introspection to update your Prisma schema from your database schema. The typical workflow when using SQL migrations and introspection is slightly different:
- Manually adjust your database schema using SQL or a third-party migration tool
- (Re-)introspect your database
- Optionally (re-)configure your Prisma Client API
- (Re-)generate Prisma Client
- Use Prisma Client in your application code to access your database
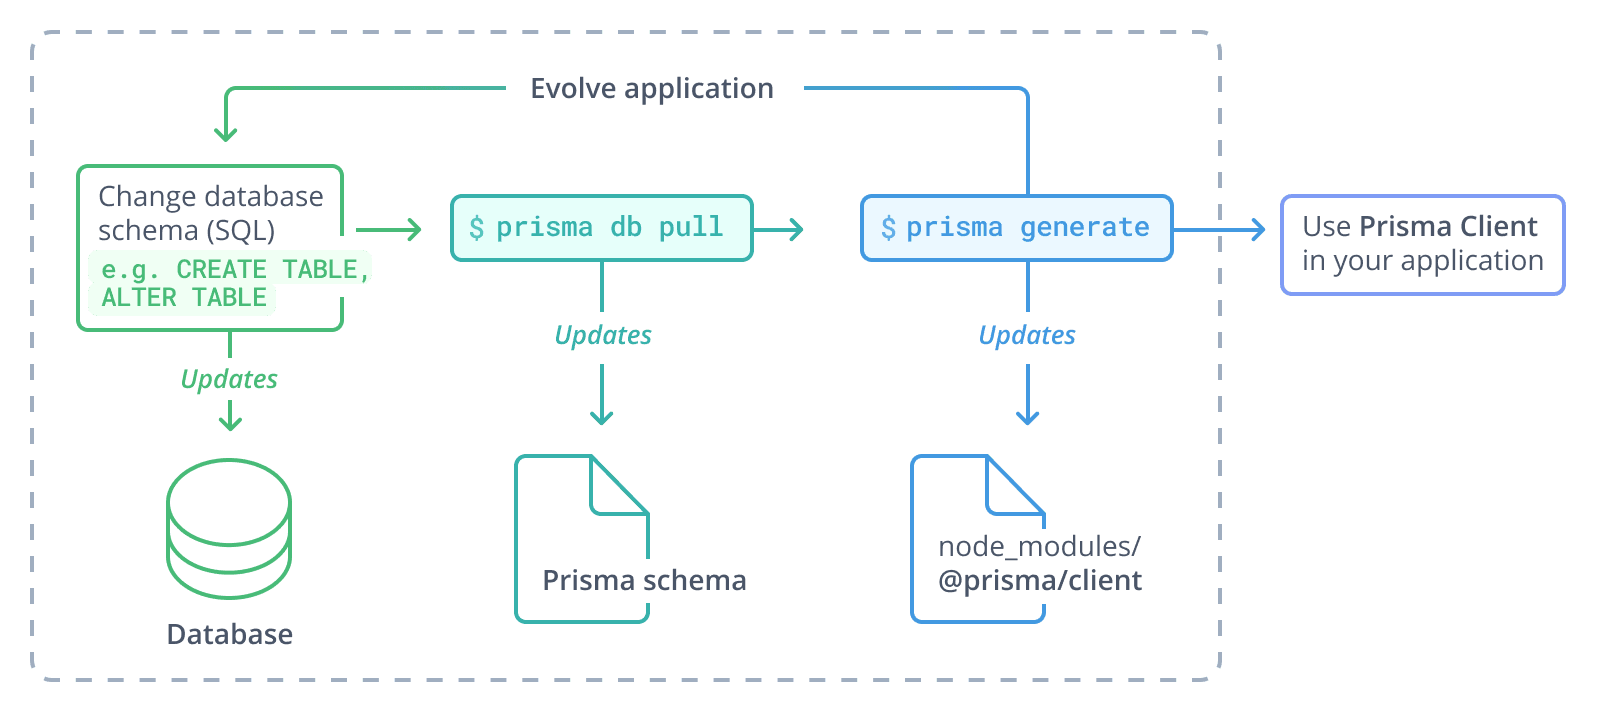
To learn more about the introspection workflow, please refer the introspection section.