Generating Prisma Client
Prisma Client is a generated database client that's tailored to your database schema. By default, Prisma Client is generated into the node_modules/.prisma/client folder, but we highly recommend you specify an output location.
To generate and instantiate Prisma Client:
-
Ensure that you have Prisma CLI installed on your machine.
bun add prisma@6.19.3 --devBash pnpm add prisma@6.19.3 --save-devBash yarn add prisma@6.19.3 --devBash npm install prisma@6.19.3 --save-dev- Add the following
generatordefinition to your Prisma schema:prisma generator client { provider = "prisma-client" output = "./generated" }[!NOTE]
You can change the output location to match your application. Common directories are
prisma,src, or even the root of your project.- Install the
@prisma/clientnpm package:
- Add the following
-
Add the following
generatordefinition to your Prisma schema:generator client { provider = "prisma-client" output = "./generated" } -
Install the
@prisma/clientnpm package:bun add @prisma/client@6.19.3Bash pnpm add @prisma/client@6.19.3Bash yarn add @prisma/client@6.19.3Bash npm install @prisma/client@6.19.3- Generate Prisma Client with the following command:
-
Generate Prisma Client with the following command:
bunx prisma generateBash pnpm prisma generateBash yarn prisma generateBash npx prisma generate- You can now instantiate Prisma Client in your code:
TypeScript import { PrismaClient } from "./prisma/generated/client"; const prisma = new PrismaClient(); // use `prisma` in your application to read and write data in your DB
Important: You need to re-run the
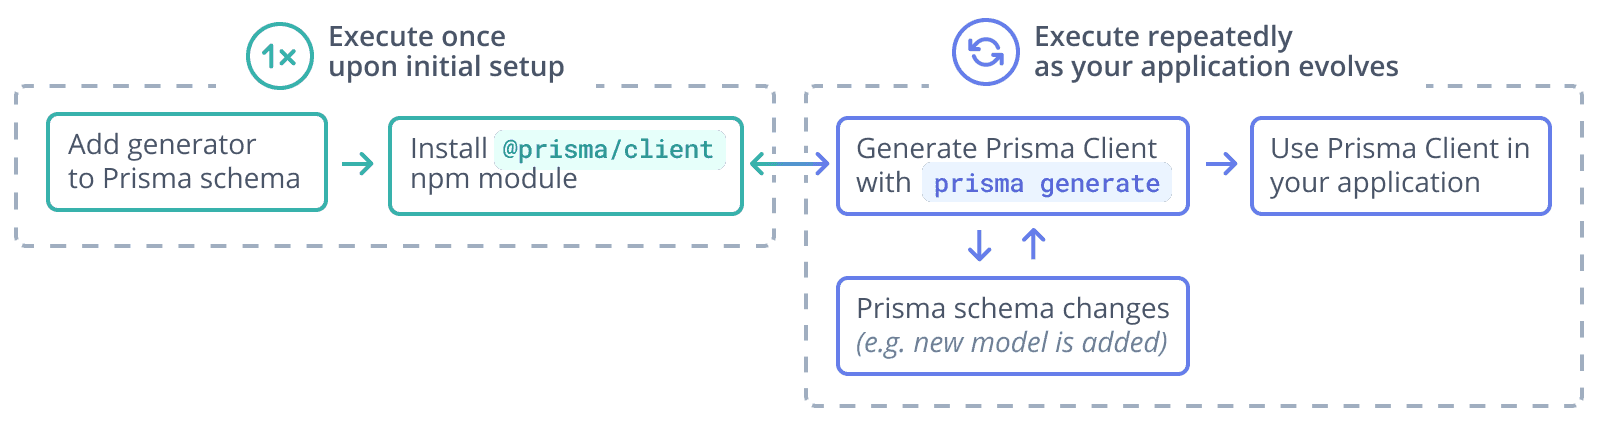
prisma generatecommand after every change that's made to your Prisma schema to update the generated Prisma Client code.Here is a graphical illustration of the typical workflow for generation of Prisma Client:

- You can now instantiate Prisma Client in your code:
-
You can now instantiate Prisma Client in your code:
import { PrismaClient } from "./prisma/generated/client";
const prisma = new PrismaClient();
// use `prisma` in your application to read and write data in your DB
Important: You need to re-run the
prisma generatecommand after every change that's made to your Prisma schema to update the generated Prisma Client code.
Here is a graphical illustration of the typical workflow for generation of Prisma Client:
You can also specify a custom output path on the generator configuration, for example (assuming your schema.prisma file is located at the default prisma subfolder):
generator client {

  provider = "prisma-client"

  output   = "../src/generated/"

}
After running prisma generate for that schema file, the Prisma Client package will be located in:
./src/generated/clientTo import the PrismaClient from a custom location (for example, from a file named ./src/script.ts):
import { PrismaClient } from "./generated/client";To load environment variables in your Prisma application, you can use the prisma.config.ts file along with the env helper from prisma/config.
-
First, install the required dependency:
bun add dotenv --devBash pnpm add dotenv --save-devBash yarn add dotenv --devBash npm install dotenv --save-dev- Create a
.envfile in your project root (if it doesn't exist) and add your database connection string:text DATABASE_URL="your_database_connection_string_here" - Update your
prisma.config.tsfile in your project root:TypeScript import "dotenv/config"; import { defineConfig, env } from "prisma/config"; export default defineConfig({ schema: "prisma/schema.prisma", migrations: { path: "prisma/migrations", }, datasource: { url: env("DATABASE_URL"), }, });
- Create a
-
Create a
.envfile in your project root (if it doesn't exist) and add your database connection string:DATABASE_URL="your_database_connection_string_here" -
Update your
prisma.config.tsfile in your project root:import "dotenv/config"; import { defineConfig, env } from "prisma/config"; export default defineConfig({ schema: "prisma/schema.prisma", migrations: { path: "prisma/migrations", }, datasource: { url: env("DATABASE_URL"), }, });
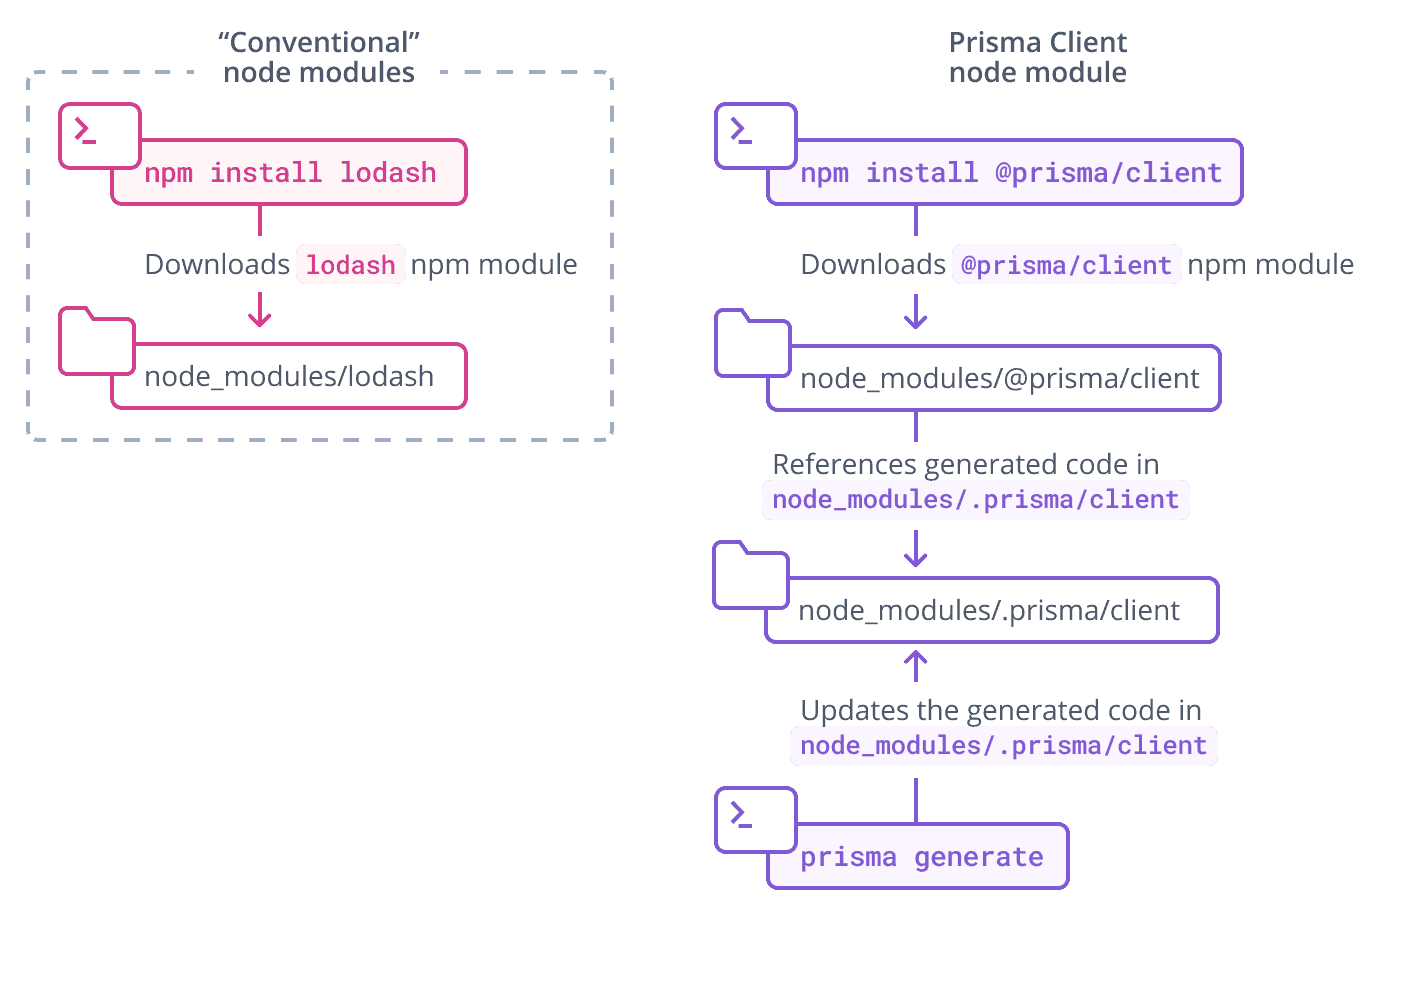
The @prisma/client npm package consists of two key parts:
- The
@prisma/clientmodule itself, which only changes when you re-install the package - The
.prisma/clientfolder, which is the default location for the unique Prisma Client generated from your schema
@prisma/client/index.d.ts exports .prisma/client:
export * from ".prisma/client";This means that you still import @prisma/client in your own .ts files:
import { PrismaClient } from "@prisma/client";Prisma Client is generated from your Prisma schema and is unique to your project. Each time you change the schema (for example, by performing a schema migration) and run prisma generate, Prisma Client's code changes:
The .prisma folder is unaffected by pruning in Node.js package managers.