This guide shows you how to use multiple databases using Prisma ORM in a single Next.js app. You will learn how to connect to two different Prisma Postgres databases, manage migrations, and deploy your application to Vercel. This approach is useful for multi-tenant applications or when you need to separate concerns when managing connections to multiple databases.
In this section, you will create two separate Prisma Postgres instances, one for user data and one for post data. You will also configure the Prisma schema and environment variables for each.
First, install Prisma and the required dependencies:
title="bun"
bun add prisma@prev tsx @types/pg --dev
pnpm
pnpm add prisma@prev tsx @types/pg --save-dev
yarn
yarn add prisma@prev tsx @types/pg --dev
npm
npm install prisma@prev tsx @types/pg --save-dev
bun add @prisma/client@7 @prisma/adapter-pg dotenv pg
[!NOTE]
If you are using a different database provider (MySQL, SQL Server, SQLite), install the corresponding driver adapter package instead of @prisma/adapter-pg. For more information, see Database drivers.
You have installed the required dependencies for the project.
You have installed the required dependencies for the project.
Initialize Prisma with a Prisma Postgres instance by running:
bunx --bun prisma@prev init --db
Bash
pnpm dlx prisma@prev init --db
Bash
yarn dlx prisma@prev init --db
Bash
npx prisma@prev init --db
[!NOTE]
If you are not using a Prisma Postgres database, do not use the --db flag. Instead, create two PostgreSQL database instances and add their connection URLs to the .env file as PPG_USER_DATABASE_URL and PPG_POST_DATABASE_URL.
Follow the prompts to name your project and choose a database region.
The prisma@prev init --db command:
Connects your CLI to your Prisma Data Platform account. If you are not logged in or do not have an account, your browser will open to guide you through creating a new account or signing into your existing one.
Creates a prisma directory containing a schema.prisma file for your database models.
Creates a .env file with your DATABASE_URL (e.g., DATABASE_URL="postgresql://user:password@host:5432/database?sslmode=require").
Rename the prisma folder to prisma-user-database:
Bash
mv prisma prisma-user-database
Edit your .env file to rename DATABASE_URL to PPG_USER_DATABASE_URL:
Open prisma-user-database/schema.prisma file and update it to define a User model. Also, set the environment variable and specify a custom output directory for the generated Prisma Client:
prisma-user-database/schema.prisma
generator client { provider = "prisma-client" output = "../prisma-user-database/user-database-client-types"}datasource db { provider = "postgresql"}model User { id Int @id @default(autoincrement()) email String @unique name String?}
Create a prisma.config.ts file for the user database:
[!NOTE]
You'll need to install the dotenv package if you haven't already:
bun
```bash
bun add dotenv
```
pnpm
```bash
pnpm add dotenv
```
yarn
```bash
yarn add dotenv
```
npm
```bash
npm install dotenv
```
Your user database schema is now ready.
Follow the prompts to name your project and choose a database region.
The prisma@prev init --db command:
Connects your CLI to your Prisma Data Platform account. If you are not logged in or do not have an account, your browser will open to guide you through creating a new account or signing into your existing one.
Creates a prisma directory containing a schema.prisma file for your database models.
Creates a .env file with your DATABASE_URL (e.g., DATABASE_URL="postgresql://user:password@host:5432/database?sslmode=require").
Rename the prisma folder to prisma-user-database:
mv prisma prisma-user-database
Edit your .env file to rename DATABASE_URL to PPG_USER_DATABASE_URL:
Open prisma-user-database/schema.prisma file and update it to define a User model. Also, set the environment variable and specify a custom output directory for the generated Prisma Client:
title="prisma-user-database/schema.prisma"
generator client {

  provider = "prisma-client"

  output = "../prisma-user-database/user-database-client-types"

}

datasource db {

  provider = "postgresql"

}

model User {

  id    Int     @id @default(autoincrement())

  email String  @unique

  name  String?

}
Create a prisma.config.ts file for the user database:
Edit the prisma-post-database/schema.prisma file to define a Post model. Also, update the datasource URL and set a custom output directory:
title="prisma-post-database/schema.prisma"
generator client {

  provider = "prisma-client"

  output = "../prisma-post-database/post-database-client-types"

}

datasource db {

  provider = "postgresql"

}

model Post {

  id    Int     @id @default(autoincrement())

  title String

  content  String?

}
Create a prisma.config.ts file for the post database:
So you don't have to pass --schema for each database on every command, add helper scripts to your package.json file that run Prisma commands for both databases:
postinstall: Runs immediately after installing dependencies to generate Prisma Clients for both the user and post databases using their respective schema files.
generate: Manually triggers the generation of Prisma Clients for both schemas, ensuring your client code reflects the latest models.
migrate: Applies pending migrations in development mode for both databases using Prisma Migrate, updating their schemas based on changes in your Prisma files.
deploy: Executes migrations in a production environment, synchronizing your live databases with your Prisma schemas.
studio: Opens Prisma Studio for both databases simultaneously on different ports (5555 for the user database and 5556 for the post database) for visual data management.
Run the migrations:
bun run migrate
Bash
pnpm run studio
Bash
yarn studio
Bash
npm run studio
This will open up two browser windows, one in http://localhost:5555 and one in http://localhost:5556. Navigate to those windows and add sample data to both databases.
When prompted, name the migration for each database accordingly.
In a separate terminal window, open two instances of Prisma Studio to add data to your databases by running the script:
bun run studio
Bash
pnpm run dev
Bash
yarn dev
Bash
npm run dev
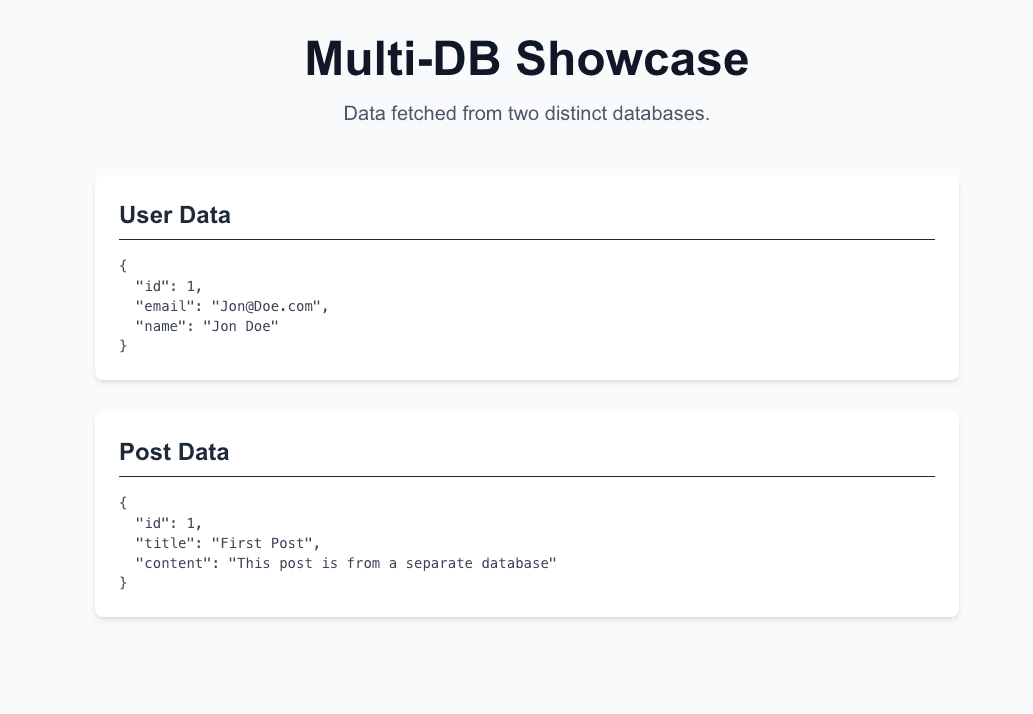
Navigate to http://localhost:3000 to see your Next.js app display data from both databases:
Congratulations, you have a Next.js app running with two Prisma Client instances querying different databases.
This will open up two browser windows, one in http://localhost:5555 and one in http://localhost:5556. Navigate to those windows and add sample data to both databases.
Before starting the development server, note that if you are using Next.js v15.2.0, do not use Turbopack as there is a known issue. Remove Turbopack from your dev script by updating your package.json:
Ensure your project is version-controlled and pushed to a GitHub repository. If you do not have a repository yet, create one on GitHub. Once the repository is ready, run the following commands:
git add .

git commit -m "Initial commit with Prisma Postgres integration"

git branch -M main

git remote add origin https://github.com/<your-username>/<repository-name>.git

git push -u origin main
Create a new project. Follow Vercel's Import an existing project guide, but stop at step 3 where you will configure environment variables before clicking Deploy.
Configure the DATABASE_URL environment variable:
Expand the Environment variables section.
Add the PPG_USER_DATABASE_URL environment variable:
Key: PPG_USER_DATABASE_URL
Value: Paste your user database connection URL, e.g. by copying it from the .env file in your project.
Add the PPG_POST_DATABASE_URL environment variable:
Key: PPG_POST_DATABASE_URL
Value: Paste your post database connection URL, e.g. by copying it from the .env file in your project.
Click the Deploy button. Vercel will build your project and deploy it to a live URL.
Open the live URL provided by Vercel and verify that your application is working.
Your application now runs on Vercel and uses two Prisma Clients to query two different databases.